If you’re a fan of buttery, gooey desserts that melt in your mouth, Butter Tart Squares should be at the top of your baking list. Inspired by Canada’s iconic butter tarts, these squares deliver all the rich, caramelized flavor you love—without the hassle of making individual tart shells. Perfect for potlucks, holiday tables, or cozy evenings at home, this treat is a guaranteed crowd-pleaser. Let’s dive into what makes irresistible—and how you can master them at home.
What Are Butter Tart Squares?
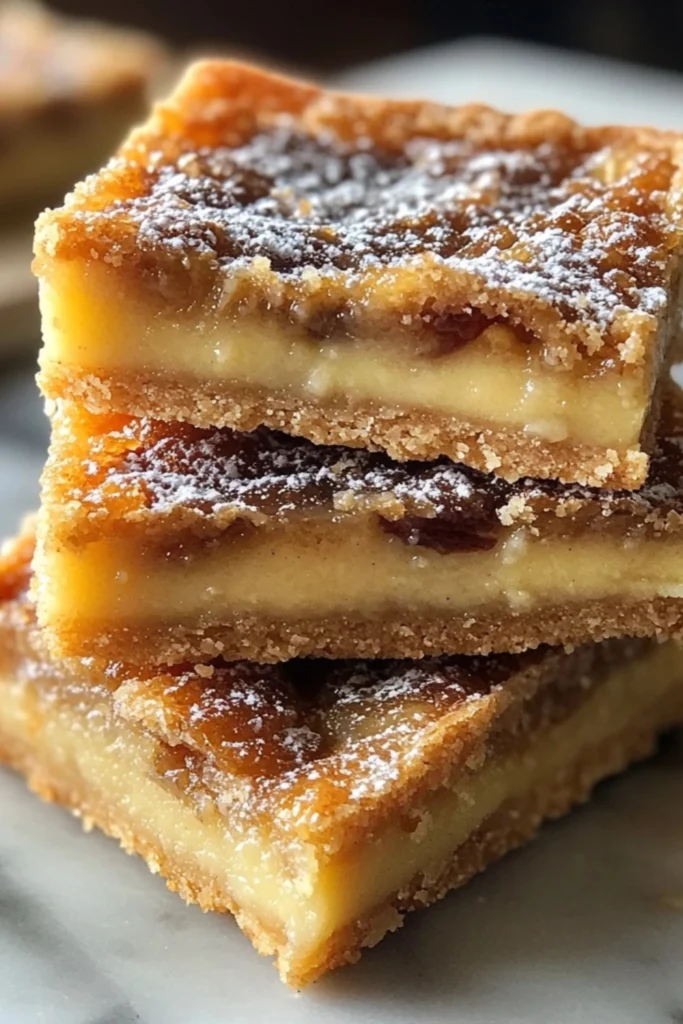
bar-style dessert featuring a shortbread-like crust topped with a gooey, caramel-like filling made from butter, brown sugar, eggs, and often a splash of vanilla. Think of them as a simplified version of the traditional Canadian butter tart—just easier to bake and serve.
Why choose squares over individual tarts?
No need to fuss with rolling or shaping pastry shells
Easy to cut into perfect portions
Great for freezing and make-ahead baking
Ideal for feeding a crowd
Ingredients
Creating the ultimate Butter Tart Squares starts with a few pantry staples. Here’s what you’ll need:
For the Crust:
-
1 cup all-purpose flour
-
1/4 cup granulated sugar
-
1/2 cup unsalted butter, cold and cubed
For the Filling:
-
2 large eggs
-
1 1/2 cups packed brown sugar
-
1/4 cup unsalted butter, melted
-
1 tablespoon all-purpose flour
-
1 teaspoon vanilla extract
-
1/2 teaspoon baking powder
-
Pinch of salt
-
Optional: 1/2 cup raisins or chopped pecans for added texture
How to Make it (Step-by-Step)
Follow this simple guide to baking Butter Tart Squares at home:
Prepare the Crust
Preheat your oven to 350°F (175°C). Grease and line an 8×8-inch baking pan with parchment paper.
In a medium bowl, combine flour and granulated sugar.
Cut in the cold butter using a pastry cutter or fork until the mixture resembles coarse crumbs.
Press the crust mixture evenly into the bottom of the prepared pan.
Bake for 15 minutes, or until lightly golden.
Make the Filling
In a large mixing bowl, whisk together eggs and brown sugar until smooth.
Stir in melted butter, vanilla, flour, baking powder, and salt.
Fold in optional raisins or pecans if using.
Assemble & Bake
Pour the filling mixture over the pre-baked crust.
Return the pan to the oven and bake for 25-30 minutes, or until the filling is set and golden on top.
Let cool completely in the pan before slicing into squares.
Tips
Cool Completely: Allow the bars to cool fully before slicing for clean edges.
Customize: Add raisins, pecans, or even chocolate chips for a fun twist.
Storage: Store Butter Tart Squares in an airtight container at room temperature for up to 3 days or freeze for longer shelf life.
Why You’ll Love it
Here are just a few reasons why home bakers keep coming back to this recipe:
Easy to make
Uses simple pantry ingredients
No pastry skills required
Perfect balance of crunchy and gooey textures
Ideal for holidays, bake sales, and gifts
Variations to Try
If you want to experiment, here are some popular variations o
-
Maple Butter Tart Squares: Add 2 tablespoons of pure maple syrup to the filling for a rich Canadian twist.
-
Nutty Butter Tart Squares: Replace raisins with walnuts or pecans for added crunch.
-
Chocolate Butter Tart Squares: Mix in mini chocolate chips to the filling.
Frequently Asked Questions (FAQ)
1. Can Butter Tart Squares be frozen?
Yes! Butter Tart Squares freeze beautifully. Wrap individual squares in plastic wrap and store in an airtight container for up to 2 months.
2. Do I need to use raisins in the filling?
No, raisins are optional. Some people love them, while others prefer their Butter Tart Squares without.
3. Can I double the recipe?
Absolutely. For a crowd, double the ingredients and bake in a 9×13-inch pan. Adjust baking time as needed.
4. What’s the difference between butter tarts and Butter Tart ?
Traditional butter tarts are individual pastry shells filled with a gooey filling. offer the same flavor in an easier, bar-style format.
5. How do I know when the squares are done baking?
The top should be golden and the filling set (not jiggly in the center). A slight puffiness is normal—it will settle as it cools.
Conclusion:
Now that you know how easy and delicious are to make, why not give them a try? Whether you’re new to baking or an experienced home cook, this recipe is sure to become a family favorite.


