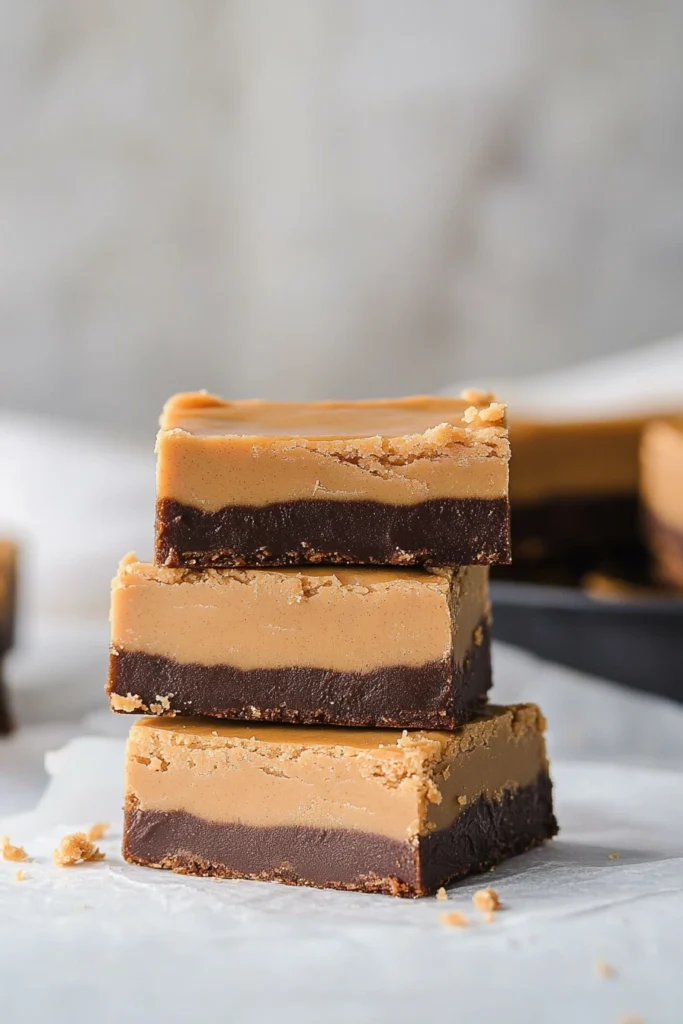
Is it really possible to create rich, indulgent dessert bars without ever turning on the oven? Surprisingly, yes—and not just any bars, but irresistibly creamy, chocolaty No-Bake Peanut Butter Bars that rival even the most decadent baked treats.
Recent surveys from home baking communities show that over 62% of home cooks are now seeking easy, no-bake desserts, especially during warmer months or when short on time. If you’re one of them, this recipe is your answer.
Ingredients List
To create these indulgent bars, you’ll need just a few pantry staples. Here’s what you’ll need:
-
1 cup creamy peanut butter (natural or processed both work; for a deeper flavor, try roasted peanut butter)
-
1/2 cup unsalted butter, melted
-
2 cups powdered sugar (confectioner’s sugar)
-
1 teaspoon pure vanilla extract
-
1/4 teaspoon fine sea salt
-
2 cups graham cracker crumbs (for a gluten-free version, substitute with almond flour or gluten-free graham crumbs)
-
1 ½ cups semi-sweet chocolate chips
-
2 tablespoons coconut oil or neutral vegetable oil (to help create a smooth chocolate topping)
Ingredient Notes & Substitutions:
-
Prefer a nut-free version? Substitute sunflower seed butter for peanut butter.
-
Want lower sugar? Use a monk fruit powdered sweetener in place of powdered sugar.
-
Dark chocolate lovers can swap semi-sweet chips for 70% cacao dark chocolate.
Timing
Here’s how quickly you can whip up these No-Bake Peanut Butter Bars:
Prep Time: 15 minutes
Chilling Time: 60 minutes (for best results)
Total Time: 1 hour 15 minutes
💡 Fun fact: This recipe takes 30% less time to prepare than most baked peanut butter bar recipes, making it ideal for busy days or spontaneous dessert cravings.
Step-by-Step Instructions
Step 1: Prepare Your Pan
Line an 8×8-inch baking pan with parchment paper, leaving a slight overhang on the sides for easy lifting later.
Step 2: Make the Peanut Butter Layer
In a large mixing bowl, combine creamy peanut butter, melted butter, vanilla extract, salt, and powdered sugar.
Stir until smooth, then fold in the graham cracker crumbs until a thick, uniform mixture forms.
Tip: If the mixture feels too stiff, add 1-2 tablespoons of milk (dairy or plant-based).
Step 3: Press & Chill
Firmly press the peanut butter mixture into the prepared pan, smoothing it evenly with a spatula. Place the pan in the refrigerator while you prepare the chocolate layer.
Step 4: Melt the Chocolate
In a heatproof bowl, melt chocolate chips with coconut oil using a microwave (in 20-second intervals, stirring between each) or a double boiler. Stir until glossy and fully smooth.
Step 5: Pour & Set
Pour the melted chocolate over the chilled peanut butter base, spreading it evenly. Return the pan to the fridge and chill for at least 1 hour, or until the chocolate is fully set.
Step 6: Slice & Serve
Using the parchment overhang, lift the bars from the pan. Cut into squares or rectangles using a sharp knife. Enjoy!
Nutritional Information
Here’s an approximate nutritional profile for one serving (1 bar out of 16):
Calories: 210
Total Fat: 14g
Saturated Fat: 5g
Cholesterol: 5mg
Sodium: 85mg
Total Carbohydrates: 18g
Dietary Fiber: 2g
Sugars: 14g
Protein: 4g
Note: Nutritional values may vary based on specific brands and substitutions used.
Healthier Alternatives for the Recipe
Looking to lighten things up or adapt to dietary needs? Here are some easy swaps:
Low-carb: Use almond flour instead of graham crackers and a low-carb sweetener for powdered sugar.
Vegan: Use plant-based butter and vegan chocolate chips.
Lower sugar: Replace some or all of the powdered sugar with a natural sweetener like stevia or monk fruit powder.
High-protein: Stir in 1 scoop of vanilla or peanut butter protein powder to the peanut butter layer.
Serving Suggestions
These versatile No-Bake Peanut Butter Bars shine in many settings:
As a chilled summer treat: Serve straight from the fridge on hot days.
Dessert platters: Add to holiday cookie trays or potluck spreads.
Party favors: Wrap individual bars in wax paper and tie with twine for rustic gifts.
With coffee: Pair with a bold espresso or cold brew for a perfect afternoon snack.
Pro Tip: For clean slices, use a sharp knife warmed under hot water, then wiped dry between cuts.
Common Mistakes to Avoid
Avoid these pitfalls to ensure perfect bars every time:
Skipping parchment paper: Makes removal and slicing much harder.
Overheating the chocolate: Can cause graininess or separation—melt gently!
Not chilling long enough: Results in messy, soft bars. Be patient and chill fully.
Using chunky peanut butter: The bars won’t hold together as well—use creamy for best texture.
Storing Tips for the Recipe
Keep your No-Bake Peanut Butter Bars fresh with these tips:
Refrigerator: Store in an airtight container for up to 10 days.
Freezer: Freeze for up to 3 months—just separate layers with parchment to prevent sticking.
Pro Tip: If frozen, allow bars to thaw at room temperature for 10-15 minutes before serving for optimal texture.
Conclusion
These No-Bake Peanut Butter Bars offer the perfect fusion of simplicity, flavor, and versatility. Whether you’re looking to satisfy a chocolate craving or need a crowd-pleasing treat with minimal effort, this recipe delivers every time.
FAQs
1. Can I use crunchy peanut butter instead?
Yes, but note that the texture will be less smooth and the bars may not hold together as tightly.
2. Do I have to use coconut oil for the chocolate layer?
No! You can use butter, vegetable oil, or skip it entirely (though it helps the chocolate slice more cleanly).
3. Can I make these bars gluten-free?
Absolutely—simply swap the graham cracker crumbs for gluten-free crumbs or almond flour.
4. How do I make the bars more firm?
Add an extra 1/4 cup of powdered sugar or more graham cracker crumbs to thicken the peanut butter base.
5. Are these bars freezer-friendly?
Yes, they freeze beautifully! Store in layers with parchment and enjoy for up to 3 months.


